Artists Guide
The user has the ability to manage all settings within WooCommerce, including adding, editing and removing products, as well as the ability to View all WooCommerce reporting tools.
Application Process
Applying to Be a Vendor
To be part of Good-Local, apply here: https://local-good.com/apply/
This information is split into two sections, User Information and Vendor Information. The first describes you, the latter describes your store.
The information you provide in your application will be shared with the Local-Good Administrators as part of the juried process for the site which also includes an interview by a representative of Local-Good.
Creator Registration Email

Upon submitting your application, you’ll receive a Vendor or Creator Registration email from Local-Good.com. Use the provided path to create a password for the site. You can create these login credentials with the provided Login Name or with the email address to which you received the email.
NOTE: These login credentials will not be valid until your application is approved.
Creator Approval

Once the Local-Good Administrator approves your application, you will receive an email confirming your application approval.
Use your created login to gain access and begin building your Store!
https://local-good.com/wp/wp-admin
Creating Your Profile
Edit Your (User) Profile
Admin, Managers and/or staff may set up their own login credentials which will allow them to create their own User Profile. The initial Profile will consist of information provided from the Vendor application.

Profile
Upon logging in, you will immediately land on your Dashboard which provides access to your Profile and Vendor Profile.


You can access your Profile in one of two ways: (1) using the left side navigation by selecting Profile, or (2) by hovering over your name in the top right corner and selecting Edit My Profile.
- Your Username will pull from the Business name you provided in your Application. This will populate on your Shop and Creator Profile.
- Your First Name and Last Name will be for Admin use only. You can also choose them for your Display Name.
- Your Nickname will not display unless you choose to select it as your Display Name.
- Your Display Name will be the Artist name that shows on your Shop and Creator Profile. You can change this as you would like.

In this example, I used First Name and Last Name fields.

Contact Info
Your Email will be used for Local-Good Admin contact. If you change this you will be required to confirm the new address before it is activated.
Edit Your Vendor Profile
Your Vendor Profile will include branding details that will introduce you to customers. Vendor Admins and Managers will be able to access and edit this information, as well. Example here for reference.


Begin by uploading your vendor logo. Note: This image should be square in dimension.

Your feature image will be displayed at the top of your Creator Profile page and your Shop page. Note: Minimal size requirements are 1380px by 720px, with a max file size of 1MB. This is the only image with a size limit due to the way the image displays as a banner.
Details such as pixel and file size will display to the right of the image after it uploads. If the selected image does not meet the size requirement, do not delete as the image can be used elsewhere. You can select another image or resize the desired image. For more details on resizing click here.

In the space titled profile, any text you include will be displayed at the top of your Creator Profile. This will be your immediate, preferably short, introduction to customers. The longer this section is, the further down the page your sale items will be. There will be an opportunity, further down the page, to describe your art and more in the About section!

After adding your text, style this section by including images in-line to your words. To do this, start by selecting the Add Media button.

When the image gallery appears, select the Upload Files tab to insert your own work.
Once you’ve placed your photo, use the image editor box to align your image with the text. This will move it to the left or right side, or place it between text breaks as you choose.

Make these changes to your Profile or About sections.
The City and State provided in your Vendor Address will be displayed at the top of your Creator Profile for customers to see.
Years of Experience will not show publicly, but can continue to be updated for Admin use.
Any websites, shops or galleries where your work is featured will have been included from your original application, and can be edited.

Tell customers more about yourself, your passion and your process as well as your Shop. This will populate at the bottom of your Creator Profile page.


- About is different from the initial Profile, it provides an opportunity to speak more about your work, your team or inspiration and your work with Local-Good.
- Policies can provide general customer service details including shipping times, returns or credit, details about customization or custom orders, any restriction or other specifics that you need to share with your customers. You can even use this space to let customers know the percentage that you donate to charity with each sale!
- Any Social Media handles provided in your Application will be displayed to customers on your Creator Profile as icons for each social platform. Feel free to edit or remove these at any time.

Once complete, you will want to save these changes by scrolling to the top of the page and selecting Update, under the Publish menu.
To view your changes as the customer would, click Visit Your Store.
Building Your Store

Store Settings
The Store settings section is the financial area for your business, and will only be available to Vendor Administrators. This space includes Vendor email address for notifications, and commission details.

- Vendor email is an important field that allows you to store multiple email addresses where notifications such as new orders and customer inquiries are sent. You may enter more than one email, separating each with a comma, to ensure that you and your team are aware of all communications and potential sales.
- You can also use this page to confirm your Commission.
- Save all changes by clicking Update before leaving the page.
Adding Your Inventory

Adding New Products
Start building your online inventory by accessing the Products tab in the navigation. This is accessible by both the Vendor Administrator and Vendor Managers.
The Add a New Product page is created using meta boxes. Meta boxes are the fields to the right, when you click on Products page, which contain details regarding categories and other descriptors. The meta fields allow you to describe your work in terms that will make it easy for customers to find.
NOTE: Meta boxes are modular fields that accept information. On this page, those boxes with dotted lines can be moved around, using the four arrow cursor, to customize your editing view. You can also change your view by selecting the Screen Options setting at the top right corner. View all fields in one scrolling page or in two columns. Because your view may be different than the one of this guide, visuals have been included to help you follow along.


To begin adding a new item, start with a unique Product Name that will help customers identify the piece.
The details you provide in this initial product description field will be visible in the Description Tab below your product and will offer customers a perfect description of your item. Note: Please do not include any media (ie: pictures and videos) in this field. There will be room for that in the Gallery space further down.

Scroll the meta boxes in the right hand column of the page to upload a single Product Image that will be the feature image.
This will populate on all pages displaying this work whether it is on your page or used on other pages throughout the site.
Below your hero image, include as many Gallery images as you like. There is space to include lots of images, this will allow you to show the work from different angles as well as any variations you offer. The additional images will show as thumbnails beneath the featured image, which will slide into frame when a user clicks on the thumbnail. You can also include your product video URL in the specified field at the bottom of the page.


Product Categories will be used to categorize items and display them on additional pages. These selections will also be visible to customers, as added details, beside the image gallery.
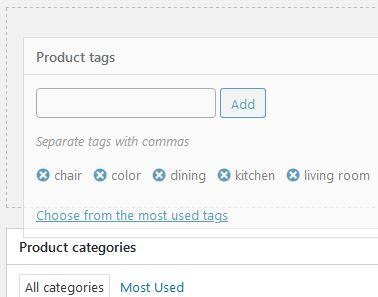
Product Tags will help customers find your product in the search bar. Be as descriptive as possible, this will help customers find your work!

Yoast SEO, Related keyphrases and Cornerstone content are all items that you can include to enhance your products search-ability on the web. This section is simply another metadata tool that can help your work be discovered on the web.
Using the tabs to the left of the Product Data box, you can provide additional details that will help your store and the customer.

GENERAL
This field allows you to set your standard price and schedule a sale price. This will populate immediately underneath the Product title across the site.
INVENTORY
This field helps manage stock and stock notifications for when your offerings are running low. You can also allow backorder. It will populate on the customer-facing site as it does in the above example.
SHIPPING
We are currently reviewing shipping options to ensure that they are the best for the shop and customer. At this time, we will not charge for shipping. Instead, we ask that you account for this cost in your product price.


LINKED PRODUCTS can help you cross sell or upsell your items. Upsell items will be presented to customers in their cart, prior to checking out. Cross sell items will be presented below the current product being viewed.
Use this feature to show customers products from your Shop that compliment this item.
NOTE: This is not a required field. At this time, we are looking to apply this to items across all LG Shops.
ATTRIBUTES: Please see Single Product vs Variable Product below.
Save all changes by selecting Update in the upper right hand corner, under Publish.
For more information, visit WooCommerce for anything that you might not see here: Setting Up Your Products
Simple Product v.s. Variable Product


A Simple Product is an item that can not be purchased with any variation or is a one of a kind piece.
Variable Product has changeable attributes which allows for variation in a single piece of work based on changes in material type, color or size, for example.
A Variable Product allows you to show the variations in a single piece of work based on Attribute Values.
An example of a Variable Product might include material types such as gold, rose gold or silver.


Create an Attribute

- Begin by listing a product’s Attribute ie: Color
- List those attribute values, separating each with a bar, “|”. Ie: Multi-color | Pink | Blue
- Select the option to make this attribute “Visible on the product page”
- Select the option “Used for variations”
- Save your changes

Create Variations
- Select “Add Variation” and “Go”
- Select your Variation from the previously created attributes Ie: Blue
- Choose to provide further detail of this product by selecting “Expand”. Include individual details for this product variation such as cost, SKU, stock, shipping information and more.
- Save details
NOTE: SKU is a stock keeping unit, a unique identifier you can choose to create for your products and note in this field.
For more information, visit WooCommerce for anything that you might not see here: Setting Up Your Products

Once you’ve completed the details of your product, Publish you work to Local-Good.com. You will need to submit your item for Administrator review. This will be the last step after you have completed all of the details for your work. You will have the ability to preview the website and/or Save your Draft if you choose to submit later on.
Viewing All Products
Once products are created, you can view item details, approval status and more from the All products tab. Click on any of these products individually to see more detail.


Hover over the product name to perform a Quick Edit, delete the product by clicking on the Trash can, or to View the item as it will look to the customer on the Local-Good site.
Viewing Your Shop

Hovering over the Local-Good icon in the top-left corner of your navigation, you can preview all shopping items. You may navigate through the site, from here, as you would if you were a customer.
This will soon change to show products only in this Vendor’s Shop.
Processing Customer Orders
Receiving Notification of an Order

When a customer makes a purchase from your shop, you’ll receive an email to the address provided. It will be addressed from Local-Good.com with the subject line, New Customer Order.
Viewing Customer Orders


Use the Orders tab to review customer requests and set the fulfillment status. Click on the Order number to see customer details. The initial status will automatically change from Pending to Payment Processing by Stripe to indicate that money is being transferred from the Customer to Local Good.

Once Stipe has captured the money from the customer, you may share the tracking number in the Order Notes.
Once you’ve shipped the order, change the fulfillment status by selecting the checkbox and Applying the Bulk Action.
Should there be an issue with the shipment or order, find the highlighted customer email address here to contact your customer by email or simply connect with them by typing your message in the Product Notes section. Make sure to select “To the Customer” in the drop down selector before clicking Add to send your message.
Once you’ve shipped the customer’s item, you may update your fulfillment status to Completed.
Commissions will be provided based on terms provided by the Store Owner.
Dashboard
Viewing Your Dashboard


Access your Dashboard quickly and easily to see a summary of your sale data at a glance. This information includes:
- Monthly net sales
- Monthly commission
- Any products low on stock
- The month’s top sellers
- All products awaiting fulfillment
- Any product out of stock
Appendix
Quick Tips
- Can’t find what you’re looking for? Search the entire document for keywords. Use your keyboard Ctrl + F to bring up the search field.
- Always include high resolution images..
- Include the full URL from your social sites to ensure validation.
- To display a product in your store, your item must include price.
- By default, refunds will be managed by Local-Good Administrators only.
Who’s Who / What’s What / Where it’s at
BACKEND/WORDPRESS ACCESS
- Local-Good Administrator: Have access to all stores and products
- Vendor Administrators: Have full access to their stores
- Vendor Managers: All users with visibility to the store, limited accessibility
- Profile Page: Every user with unique credentials will have a profile.
- Vendor Profile Page: Brand details for the Artist and Shop.
- Store Settings Page: Financial details of the store.
FRONTEND/CUSTOMER SITE
- Creator Profile Page: Introduces customers to the Business and the Artist behind the business. All and any information about the business and team is found on this page, including money raised, store policies and social profiles.
- Vendor Shop Page: Customers will be able to browse all products your Shop has to offer.
F.A.Q.
- Q: Who approves submissions, How long do they take?
Local-Good Administrators will approve individual products in order for them to be published and viewed on the site. These submissions are addressed as they are received.
- Q: How do I save my product?
If there is no option to “Update” an item, products will autosave.
- Q: What is Yoast SEO?
This content can help enhance your products search-ability on the web (ie: Google, Yahoo!). If you don’t feel comfortable including it, it won’t help or hurt your Store or product in any way!
- Q: Why isn’t my perfectly sized image not displaying the way I want it to?
Similar to Facebook or any other social platform, you may have to crop or scale your image to get it to display the you’d like it to. Do this by using the following instructions:

- Go to the Media Library in the Admin toolbar on the left side of your screen
- Select Library
- Scroll to find your image and select it
- Select Edit under the image
- Select Crop in the top right hand corner
- Use the bar at the left to type in the new dimensions if preferred.


- Before saving, make sure to select the appropriate checkboxes in theThumbnail Settings.
- Select Save
Adding a Gallery
Galleries are a fun and eye-catching way to show your work off to potential customers.
It is placed under your description on your store page and gives you a great way to provide various samples of what you create.
They also show up when you are the featured artist on the homepage, adding an extra way to bring customers to your store.
To add a gallery, visit the
Store Page option on your account.
Scroll down, and you’ll find the Image Gallery Section. You can upload up to 10 images to the gallery. Please note the sizing requirement listed for the section. To add images, click the Add to gallery button.
Upload and then Select the images you wish to add to your gallery.
Congratulations, your images are in your gallery! Go to your storefront to view your gallery and start showcasing more work to your customers!